
ZZ Plant Potting Soil
With its glossy leaves, upright growth, and remarkable resilience, the ZZ plant (Zamioculcas zamiifolia) is a favorite among houseplant enthusiasts. But even this low-maintenance plant has its limits. Over time, potting soil can break down, roots can outgrow their space, and growth may begin to slow. The lush, vibrant foliage you once enjoyed may gradually look dull or less healthy.
Read More
Often, the problem starts when the soil can no longer meet the plant's needs. If your ZZ plant has stopped producing new growth or the soil stays wet for too long after watering, it may be time to refresh its potting mix.
In this guide, we'll cover everything you need to know about repotting a ZZ plant, including the best time to change its soil, warning signs to watch for, the ideal potting mix, and step-by-step instructions for repotting it safely.
When Is the Best Time to Change a ZZ Plant's Soil?
Choosing the right time to repot your ZZ plant is one of the most important parts of the process. ZZ plants have thick, fleshy roots and underground rhizomes that store water. Disturbing them at the wrong time can put unnecessary stress on the plant.
What Is the Best Season to Repot a ZZ Plant?
Early spring is generally the best time to repot a ZZ plant. As the growing season begins, temperatures become more moderate, daylight increases, and the plant starts producing new growth. Its roots are better positioned to establish themselves in fresh soil, helping the plant recover more quickly.
Late winter can also work in mild climates, provided the coldest weather has passed and the plant is beginning to show signs of active growth.
Fall and winter are generally less suitable for repotting because growth slows during these seasons, making recovery less predictable. Extremely hot summer weather is also best avoided, as high temperatures and increased evaporation can add to transplant stress.
However, there is one important exception: if your ZZ plant has signs of root rot or another serious problem, don't wait until spring. Saving the plant takes priority over following the ideal seasonal schedule.
How Often Should You Change ZZ Plant Soil?
Under normal conditions, a ZZ plant typically needs fresh potting soil every two to three years. However, the timing depends on the plant's growth rate, the condition of the potting mix, and how much space the roots have.
Plants growing vigorously or filling their pots with roots may need attention sooner. Smaller pots may also require more frequent repotting.
Rather than relying entirely on a fixed schedule, pay attention to the plant itself. Changes in growth, soil texture, drainage, and root development are often better indicators that it's time for a refresh.

Signs Your ZZ Plant Needs Fresh Soil
Your ZZ plant will often show signs of trouble before its health seriously declines. Knowing what to look for can help you address problems early.
1. Slow Growth or No New Leaves
Slowing growth can be an early warning sign. If your ZZ plant hasn't produced new leaves for an unusually long time or its new growth is smaller than before, the roots may be running out of room.
The potting mix may also have deteriorated or lost some of its ability to support healthy root growth. Keep in mind that ZZ plants naturally grow slowly, particularly during fall and winter, so a lack of new leaves alone doesn't necessarily mean repotting is needed.
2. Yellowing or Dull Leaves
Yellowing leaves can indicate that something is wrong with the plant's growing conditions. Although watering problems are a common cause, deteriorating soil and poor drainage can also contribute.
If yellowing continues despite correcting your watering routine, check the soil and roots. Older, lower leaves may turn yellow first, while the overall plant gradually loses its healthy appearance.
3. Compacted Soil and Poor Drainage
Over time, potting mix can become compacted, making it harder for water and air to move through it properly.
If water struggles to soak into the soil or runs quickly down the sides of the pot without properly wetting the root ball, the mix may have deteriorated.
Healthy potting soil should remain loose and provide good drainage. Dense, compacted soil can limit the oxygen available to roots, increasing the risk of root rot.
4. Unpleasant Soil Odor and Possible Root Rot
An unpleasant, sour, or musty smell coming from the potting mix is a warning sign, especially when combined with persistently wet soil or yellowing leaves.
These symptoms may indicate that the roots are beginning to rot. If you suspect root rot, remove the plant from its pot, inspect the roots and rhizomes, and trim away any dark, mushy, or foul-smelling tissue using clean, sterilized scissors.
Replace the old mix with fresh, well-draining soil and use a pot with drainage holes. Don't delay if the plant shows clear signs of root rot.
5. Roots Emerging From the Drainage Holes
Roots growing through the drainage holes or appearing at the soil surface can indicate that your ZZ plant has outgrown its pot.
This doesn't automatically mean the plant is unhealthy, but it may be time to move it into a slightly larger container. A severely crowded root system can make watering more difficult and limit the space available for further growth.
What Is the Best Soil for a ZZ Plant?
ZZ plants need a potting mix that is lightweight, airy, and well-draining. Heavy garden soil and dense, clay-rich mixes are poor choices because they tend to hold too much water around the roots.
The goal is to provide enough moisture for the plant to absorb what it needs while allowing excess water to drain freely.
What Makes a Good ZZ Plant Potting Mix?
An ideal potting mix should:
- Drain excess water quickly to reduce the risk of root rot.
- Retain a moderate amount of moisture without staying soggy.
- Allow air to circulate around the roots.
- Provide a suitable growing environment for healthy root development.
- Be fresh and free from obvious signs of pests or disease.
A commercial cactus and succulent potting mix is often a good starting point because it generally drains better than standard potting soil. You can improve it further by adding perlite or pumice to increase aeration and drainage.
A small amount of quality organic material can help retain some moisture and provide a suitable growing medium. Peat moss or coco coir can serve this purpose, although the final mix should never become dense or waterlogged.
The key is balance: good drainage, adequate airflow, and moderate moisture retention.
Always use a clean potting mix from a reliable source. Contaminated soil can introduce pests or plant diseases into your collection.
The Best DIY Soil Mix for a ZZ Plant
If you prefer to make your own potting mix, a simple combination of peat moss or coco coir, perlite, and well-decomposed leaf mold can work well.
Recommended Soil Mix Ratios
For a balanced mix, try the following proportions by volume:
- 2 parts peat moss or coco coir
- 1 part perlite
- 1 part well-decomposed leaf mold
You can replace some of the perlite with pumice if you prefer. If your home is particularly humid or you tend to water frequently, use a more mineral-based mix to improve drainage.
Avoid using garden soil as the main ingredient, since it can compact in containers and restrict airflow.
Choosing the Right Pot
The container you choose is just as important as the soil.
Select a pot only one size larger than the current one, typically about 1–2 inches wider in diameter. An oversized pot holds more soil than the roots can use efficiently, increasing the time it takes for the mix to dry out and raising the risk of overwatering.
Most importantly, choose a pot with drainage holes. Without a way for excess water to escape, even a well-formulated potting mix can remain too wet.
How to Repot a ZZ Plant Step by Step
Repotting a ZZ plant isn't difficult, but taking your time can help protect its roots and underground rhizomes.
Step 1: Prepare the Plant
Water the plant lightly the day before repotting if the soil is very dry. Slightly moist soil is often easier to remove from the pot than completely dry soil.
However, don't water beforehand if the mix is already wet or you suspect root rot. In that case, allow the soil to drain as much as possible before handling the plant.
Gather your fresh potting mix, new pot if needed, and a pair of clean, sterilized scissors.
Step 2: Remove the Plant From Its Pot
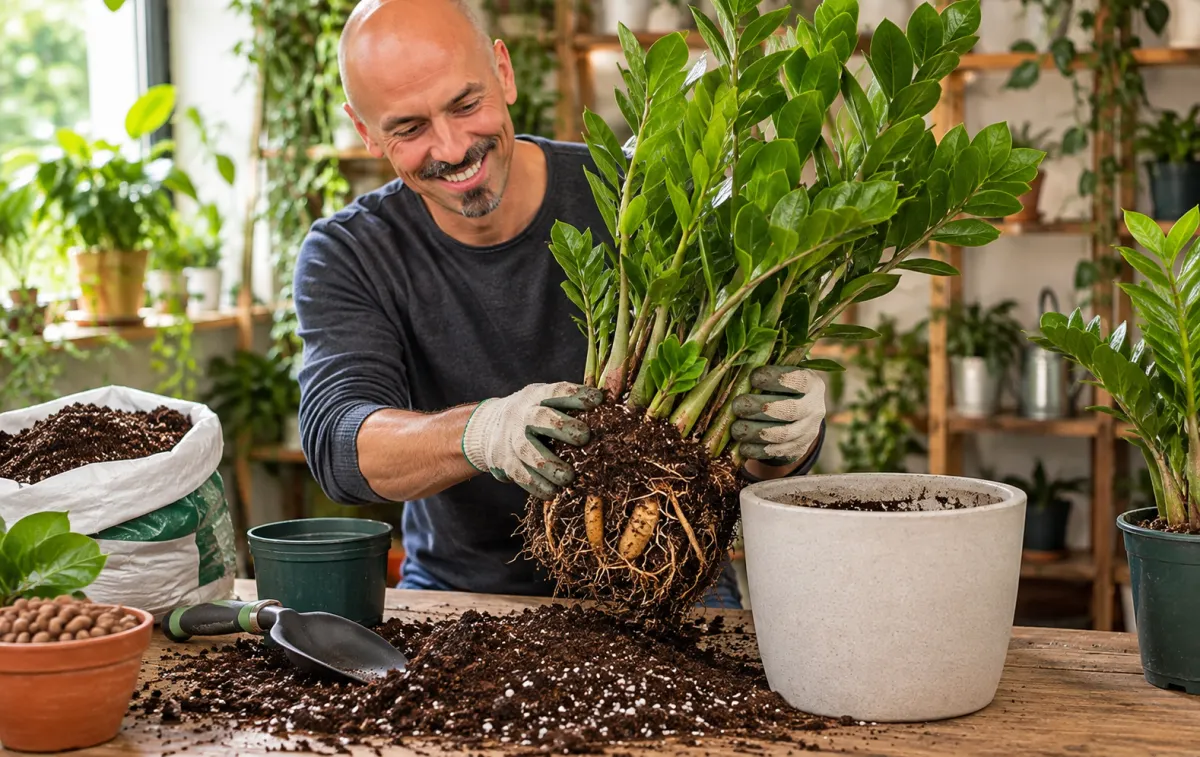
Gently tilt the pot onto its side while supporting the plant near the base. Tap the sides of the container to loosen the root ball.
If the plant is stuck, carefully squeeze a flexible plastic pot or slide a blunt tool around the inside edge of the container.
Never yank the stems or pull forcefully on the foliage. The goal is to release the root ball without damaging the roots or rhizomes.
Step 3: Inspect the Roots and Remove Old Soil
Once the plant is out of its pot, gently loosen and remove some of the old soil around the roots.
Healthy roots and rhizomes should feel firm. Depending on their age and condition, healthy roots may be cream-colored, tan, or light brown.
Look for roots that are dark, soft, mushy, or unpleasant-smelling. Trim away any damaged sections with clean, sterilized scissors.
If the roots and rhizomes are firm and healthy, there's no need to remove every particle of old soil. Avoid unnecessary root disturbance, especially if the existing mix is still in good condition.
Step 4: Add Fresh Soil and Position the Plant
Place a thin layer of fresh potting mix in the bottom of the new pot.
Position the ZZ plant in the center, making sure the roots and rhizomes sit comfortably without being forced into place. Keep the plant at roughly the same depth it was growing at previously.
Fill the spaces around the root ball with fresh mix, distributing it gently around the roots.
Don't pack the soil tightly. Lightly firm it with your hands so the plant stands upright while leaving enough air space for healthy root development.
Step 5: Water the Plant
If you removed the plant because of root rot, allow any freshly cut root tissue to dry before repotting, and adjust the initial watering accordingly.
For a healthy plant repotted into fresh, well-draining soil, water gently until the mix is evenly moist and excess water drains through the holes.
Empty the saucer or outer pot afterward so the plant isn't left sitting in standing water.
How to Care for a ZZ Plant After Repotting
Proper aftercare helps your ZZ plant settle into its new pot with minimal stress. The most important factors are watering, light, and avoiding unnecessary fertilizer.
Adjust Your Watering Routine
After the initial watering, let the potting mix dry out substantially before watering again. ZZ plants store water in their rhizomes, so they are more tolerant of short dry periods than persistently wet soil.
Check the soil rather than following a rigid watering schedule. The potting mix, temperature, light levels, and pot size all affect how quickly it dries.
Freshly disturbed roots are particularly vulnerable to excess moisture, so avoid keeping the soil constantly damp.
Provide Bright, Indirect Light
For the first several days, place your ZZ plant in a spot with gentle, indirect light. Avoid sudden exposure to intense direct sunlight, especially if the plant has been growing in a relatively dim location.
Once it has settled in, return it to its usual growing position, provided the light conditions are suitable.
Wait Before Fertilizing
There's no need to fertilize immediately after repotting. Fresh potting mix may already contain nutrients, and applying fertilizer too soon can add unnecessary stress to disturbed roots.
Wait around four weeks before considering a light application of a balanced houseplant fertilizer, unless the potting mix instructions recommend a different schedule.
Follow the product label and avoid overfertilizing. More fertilizer doesn't necessarily mean faster growth.
Give the Plant Time to Adjust
Your ZZ plant may show mild drooping or a temporary pause in growth after repotting. Some adjustment is normal, particularly if the roots were disturbed.
Maintain suitable light and watering conditions, and give the plant time to recover. It may take several weeks or longer to resume noticeable growth.
If the leaves continue to yellow, the soil remains wet for too long, or the plant develops a foul odor, inspect the roots and reassess your watering routine.
Common Mistakes to Avoid When Repotting a ZZ Plant
Even a hardy ZZ plant can struggle if repotting is handled incorrectly. Avoid these common mistakes:
- Choosing a pot that's too large: Excess soil can stay wet for too long, increasing the risk of root rot.
- Using heavy, poorly draining soil: Dense potting mixes can restrict airflow and retain too much moisture.
- Overwatering after repotting: Constantly wet soil can damage roots and rhizomes.
- Packing the soil too tightly: Compacted soil reduces airflow around the roots.
- Fertilizing too soon: Freshly disturbed roots may be sensitive to concentrated fertilizer.
- Ignoring root health: Failing to remove rotting roots can allow the problem to continue in the new pot.
- Repotting unnecessarily: Healthy ZZ plants don't need frequent repotting, and disturbing their roots without a good reason can create avoidable stress.
Most importantly, pay attention to the condition of the soil and roots rather than relying on a fixed repotting schedule. With the right growing conditions and a little patience, your ZZ plant can continue producing glossy, healthy foliage and remain an attractive part of your home for years to come.